【備忘録】Railsでcheck_box_tagがfalseのときもパラメータを飛ばしたい
Rails速習実践ガイドめっちゃいいね、どうもてぃです。
さて、昔実装したのに、しばらくやってないと忘れることよく有りますよね。
今回は備忘録として忘れてたことを書きたいと思います。
環境
やったこと
check_box_tagでパラメータを飛ばす場合、デフォルトではチェックのついたものしか飛びません。ということを完全に忘れていて、軽く30分くらい悩みました。
なので、適切な対処が必要。
まずはcheck_box_tagのリファレンスを確認。おなじみのrailsdocです。
<%= check_box_tag 'page[freezeflag]', true, false, {} %>
# <input id="page_freezeflag" name="page[freezeflag]" type="checkbox" value="true" />
これ使ってみます。
check_box_tagの第一引数はパラメータのkey名 & 属性のIDとname、第二引数は渡す値、第三引数は初期値、第四引数は状態を表してます。
チェックがついていると、strongparameterの中に
{ "page" => <ActionController::Parameters { "freezeflag" => "true" } permitted: false> }
という形で入ります。チェック無しだとそもそも、params["page"]がnilになります。
これはデータを更新する上で不便。チェックがあるかどうかで無駄な処理を書かなきゃいけないのはスマートじゃないです。
それを解消するのがhidden_field_tag。
必ずcheck_box_tagの前に設置しましょう!
それが以下。
<%= hidden_field_tag 'page[freezeflag]', false %>
<%= check_box_tag 'page[freezeflag]', true, false, {} %>
# <input id="page_freezeflag" name="page[freezeflag]" type="checkbox" value="true" />
check_box_tagにチェックが入らなければ同じ名前のhidden_field_tagの値(false)がパラメータとして飛ぶ。
逆にチェックがついていればcheck_box_tagの方で値が上書きされるという感じ。
必ずnameは同じにしないといけないことに注意。あと最初に言ったけど、hidden_field_tagの位置にも注意。
これで今回の要件を満たせます。
番外編(おまけ)
素晴らしいメソッドを見つけました。
ActiveRecord::Type::Boolean.new.castです。
以下の記事に書いてありました。素晴らしいです。ありがとうございます。
なので、今回飛ばしている値を変更します。
<%= hidden_field_tag 'page[freezeflag]', 0 %>
<%= check_box_tag 'page[freezeflag]', 1, false, {} %>
# <input id="page_freezeflag" name="page[freezeflag]" type="checkbox" value="true" />
これで、パラメータとしてチェック済みの時は文字列の1、チェック無しだと文字列の0が飛びます。
上の記事のように、models/applilcation_record.rbへ専用のメソッドを書いておくと。。。
def checked?(data)
  ActiveRecord::Type::Boolean.new.cast(data)
end
checked?の引数に飛んできたチェックボックスのパラメータを渡すとtrue or falseを判定してくれます。
すばらしい。感動しました。
【Ruby】スクレイピングに精度を求めるならNokogiriではなくSeleniumだ
どうもてぃです。
とある巨大ECサイト(通称熱帯雨林)をスクレイピングして遊んでいます。
今回は nokogiri で問題が発生したので記事にしました。
nokogiriのスクレイピング精度はあんまり良くないのを実体験で痛感しましたね。
environment
issue
ページネーション要素の取得です。
Nokogiriだと4〜6割の確率でページネーションを取得できない場合があります。
問題なのが、Seleniumだとページを読み込み終わるまで待つSelenium::WebDriver::Waitがあるのに対して、Nokogiriにはwaitが存在しません。
あと、NokogiriではJS等で動的に表示しているページは上手く取得できないことがあるとのこと。
だからSeleniumでブラウジングしてスクレイピングする方が成功確率は高いと。
最初からSelenium使えばよかったですわ。PythonもSeleniumだし。
solution
試しに、一番お手軽なスクレイピングサイト、巨大ECサイト熱帯雨林を使ってみます。
ここだと、ページネーションもありますので。
最近switchのスマブラが販売されて転売ヤーさんが乱立しているGCコンをスクレイピングしてみます。
require 'selenium-webdriver'
ua = "Mozilla/5.0 (Macintosh; Intel Mac OS X 10_8_4) AppleWebKit/537.36 (KHTML, like Gecko) Chrome/27.0.1453.116 Safari/537.36"

# headlessモードのoptionをつける
options = Selenium::WebDriver::Chrome::Options.new
options.add_argument('--headless')
options.add_argument('--disable-gpu')
options.add_argument("--user-agent=#{ua}")

driver = Selenium::WebDriver.for(:chrome, options: options)
driver.get('https://www.amazon.co.jp/gp/offer-listing/B07HC2F97Q/ref=dp_olp_new?ie=UTF8&condition=new')

# ページ読み込みのwaitを設定
wait = Selenium::WebDriver::Wait.new(timeout: 10)

# find_elementで単数取得
wait.until { driver.find_elements(:xpath, "//h3[@class='a-spacing-none olpSellerName']/span/a") }
seller_info = driver.find_elements(:xpath, "//h3[@class='a-spacing-none olpSellerName']/span/a")
wait.until { driver.find_elements(:xpath, "//ul[@class='a-pagination']/li/a").map { |el| el.attribute(:href) } }
pagination = driver.find_elements(:xpath, "//ul[@class='a-pagination']/li/a").map { |el| el.attribute(:href) }

# ページネーションの最後までクリックする
loop.with_index(1) do |_, i|
  puts "==================================#{i}回目==================================="
  puts driver.find_elements(:xpath, "//h3[@class='a-spacing-none olpSellerName']").map(&:text)

  break if driver.find_elements(:xpath, "//ul[@class='a-pagination']/li/a").last[-1] == '#'
  driver.find_elements(:xpath, "//ul[@class='a-pagination']/li/a").last.click
end

# 二回目のget urlも問題ない
driver.get('https://www.amazon.co.jp/sp?_encoding=UTF8&seller=A2W8UAZHGIMLV7')

driver.close
上記ソースを超簡単に説明。
# headlessモードのoptionをつける
options = Selenium::WebDriver::Chrome::Options.new
options.add_argument('--headless')
options.add_argument('--disable-gpu')
options.add_argument("--user-agent=#{ua}")
Selenium::WebDriver::Chrome::Options.newでSeleniumのオプションを設定するインスタンスを生成します。
AWSやGCPで動かすことも想定にいれて、ヘッダレスでブラウザを起動しないようなオプションをつけています。
ついでにユーザーエージェントも設定してます。
# ページ読み込みのwaitを設定
wait = Selenium::WebDriver::Wait.new(timeout: 10)
スクレイピングをした際にページが全て表示されるまで待つ必要が有ります。
その設定を上記でやっています。使い方は
wait.until { driver.find_elements(:xpath, "//h3[@class='a-spacing-none olpSellerName']/span/a") }
seller_info = driver.find_elements(:xpath, "//h3[@class='a-spacing-none olpSellerName']/span/a")
wait.until { driver.find_elements(:xpath, "//ul[@class='a-pagination']/li/a").map { |el| el.attribute(:href) } }
pagination = driver.find_elements(:xpath, "//ul[@class='a-pagination']/li/a").map { |el| el.attribute(:href) }
のように、要素を取得する前にwait.utilを設定します。簡単です。
残りは要素の取得の処理がメインですね。
loopの部分でページネーションのリンクをクリックし続ける処理をやっています。そんな大したことはやってないです。
最後に
やはり、困った時はrubydocが役に立ちます。
Class: Selenium::WebDriver::Driver — Documentation for selenium-webdriver (0.0.28)
是非参考にしてみてください。
なにかあればコメント欄で〜。
ではでは。
【スクレイピング】HerokuでSelenium::WebDriver::Error::SessionNotCreatedError: session not created from tab crashed
あけましておめでとうございます。
どうもてぃです。
HerokuでSeleniumを使ったスクレイピングをした際にエラーが不規則に出たので共有します。
環境
参考
公式のリポジトリをまず参考にしました。issueが上がってましたね。
要するに、Heroku上のchromedriverのバージョンがサポートされているかどうか問題で動いたり動かなかったりするらしい。
最後の文にも書いてる通り
Yep, v59 confirmed. Not sure how folks are using this pre-59 :)
https://developers.google.com/web/updates/2017/04/headless-chrome
If this issue persists after v59 and associated Chromedriver are released, I'll re-open it.
chromedriverがリリースされた後に問題が上がればまたissueをopenにするぜ
だって。
対策
このスクレイピングに関しては絶対にうまく行くという保証ができないので、エラーが出た際に落ちないようにするしか無いです。
今回は一時的にテスト環境としてHerokuを使っているので、本番環境ができるまではHerokuで我慢し、エラーをキャッチする方法で対処します。
require 'selenium-webdriver'

# selenium headlessモードでchromeを立ち上げる
options = Selenium::WebDriver::Chrome::Options.new
options.add_argument('--headless')
options.add_argument('--disable-gpu')

# userAgentの設定
webdriver = Webdriver::UserAgent.driver(browser: :chrome, agent: :random, orientation: :landscape)
user_agent = webdriver.execute_script('return navigator.userAgent')
options.add_argument("--user-agent=#{user_agent}")

begin
  driver = Selenium::WebDriver.for(:chrome, options: options)
rescue => e
  # Selenium::WebDriver::Error::SessionNotCreatedError: session not created from tab crashed
  puts e
  next
end

driver.get(url) # urlにはスクレイピングしたいurlをセットする
終わりに
一旦はこれで解決です。
日本語での解決方法がなかなかみつからなかったので記事にしました。
他に解決方法がありましたら教えていただけると幸いです。
またGitHubの方で進展が有りましたら記事にすると思います。
では、今年もよろしくお願いしますー。
【Ruby】スクレイピングをするときはUserAgentを設定しましょう
どうもてぃです。
現在業務でスクレイピングをしたデータをシステム上でよしなにやって、楽しく過ごしています。
今回とある、巨大なECサイト(俗称:熱帯雨林)をスクレイピングした際にエラーに見舞われたので、解決策を残しておこうと思います。
実行環境
つかったもの
もちろん、今回もこの子を使いました。
何が起こったか
以下がソース。
一般的な使い方ですね。
require 'open-uri'
require 'nokogiri'

sufixes = [1, 2, 3, 4]
sufixes.each do |sufix|
  url = Constants::BASE_URL + suffix
  charset = nil

  begin
    html = open(url) do |f|
      charset = f.charset
      f.read
    end
  rescue => e
    puts e
    next
  end

  doc = Nokogiri::HTML.parse(html, nil, charset)
 ・
 ・
 ・
end
上記の書き方だと、スクレイピング先が多くなればなるほど、一定確率で 503エラーが発生します。
これは、スクレイピングするURLをopenするときに、ユーザーエージェントが指定していないため発生するそう。
なので、擬似的にユーザーエージェントを指定してあげる。
解決方法
開発者コンソールを開いて、Network -> ctrl + rで更新 -> bookmarkのファイルを選択 -> RequestHeaderのユーザーエージェントをコピーして適当に使う。
Mozilla/5.0 (X11; Linux x86_64) AppleWebKit/xxxxxx (KHTML, like Gecko) Chrome/xxxxxx Safari/xxxxx
こんな感じのやつ。
これでなくても、ユーザーエージェントを偽装してやればいいので、正直言えばなんでもいい。
require 'open-uri'
require 'nokogiri'

opt = {}
opt['User-Agent'] = 'Mozilla/5.0 (X11; Linux x86_64) AppleWebKit/xxxxxx (KHTML, like Gecko) Chrome/xxxxxx Safari/xxxxx'

sufixes = [1, 2, 3, 4]
sufixes.each do |sufix|
  url = Constants::BASE_URL + suffix
  charset = nil

  begin
    # open時にぶち込む
    html = open(url, opt) do |f|
      charset = f.charset
      f.read
    end
  rescue => e
    puts e
    next
  end

  doc = Nokogiri::HTML.parse(html, nil, charset)
 ・
 ・
 ・
end
こうすると、503エラーでスクレイピング失敗することがなくなります。
nokogiriでこんなエラー出たの初めてだったので結構困りました。
解決できてよかった。
【GAE + CloudSQL + Rails】bundle exec rails appengine:exec -- bundle exec rails db:migrate時にCloudSQLで接続エラーになる

どうもてぃです。
今回始めてGAEを使います。
gemのwheneverがheroku上で使えなかったので、もういっそのことステージング環境を作ってしまい、あとからそのスナップショットで本番環境を作ろうと企んでいたところ、そもそも初っ端からつまづきました。
環境
まずは参考記事
いろんな記事やリファレンスを参考にしました。
Google App Engine から接続する | Cloud SQL ドキュメント | Google Cloud
Google Compute Engine(GCE)からCloud SQL接続でハマった - Qiita
RailsアプリをGAEにデプロイしCloudSQL, CloudStorageと連携させる - Qiita
GoogleAppEngine+CloudSQL(MySQL)+Rails5環境を作成する - Qiita
GAEにデプロイしたRailsからGoogle Cloud SQL に疎通できない時に確認すること - 俺、サービス売って家買うんだ
約一週間ほど溶かしました。。。
まだ完璧に解決したわけではないですが。
試したこと
Cloud SQLの有効化
こちらにアクセスしてCloud SQLを有効化します。
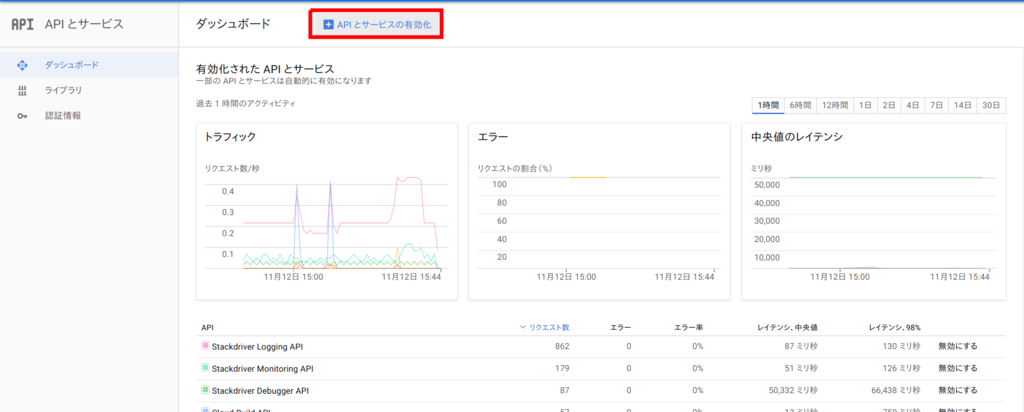
ダッシュボードにきたら「APIとサービスの有効化」をクリック。
検索フォームが出てくるので、「Cloud SQL」と入力。
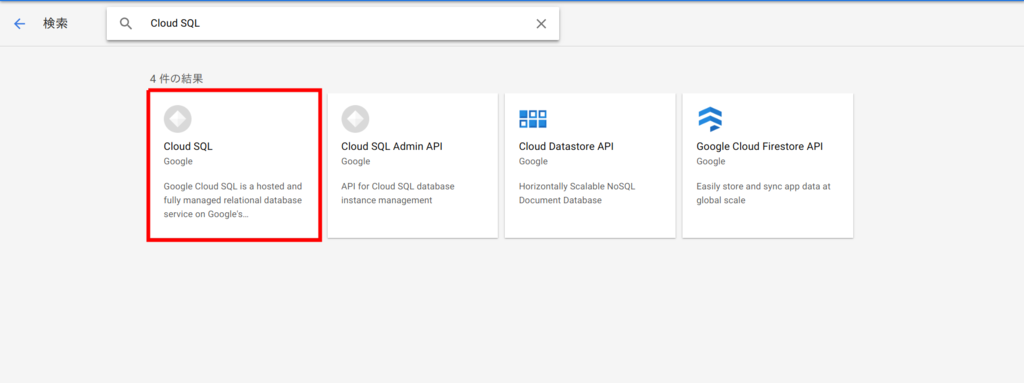
出てきたCloud SQLをクリックし、遷移先でAPIを有効化させたらおk(画像貼るのめんどくさくなった)。
Unixソケットでのプロキシ接続
以下の手順で接続しました。
環境が64bitのLinuxなので
https://dl.google.com/cloudsql/cloud_sql_proxy.linux.amd64
をwgetする。
$ cd ~; wget https://dl.google.com/cloudsql/cloud_sql_proxy.linux.amd64 -O cloud_sql_proxy

$ chmod +x cloud_sql_proxy

$ sudo mkdir /cloudsql; sudo chmod 777 /cloudsql

$ ./cloud_sql_proxy -dir=/cloudsql -instances=<INSTANCE_CONNECTION_NAME>
INSTANCE_CONNECTION_NAMEはgcloud sql instances describe [INSTANCE_NAME]で出てくるconnectionNameを使います(INSTANCE_NAMEはCloudSQLの名前)。
もしくはブラウザからGCPにアクセスして、プロジェクトのCloudSQLで該当のSQLインスタンスを見ればわかると思います。
プロキシで接続すると、
2018/11/12 15:40:17 Rlimits for file descriptors set to {&{8500 1048576}}
2018/11/12 15:40:23 Listening on /cloudsql/<INSTANCE_CONNECTION_NAME>/.s.PGSQL.5432 for <INSTANCE_CONNECTION_NAME>
2018/11/12 15:40:23 Ready for new connections
。
と出てきます。
問題なく接続できてるようです。認証もできてるはず。
gcloudでsqlに接続してみる
CloudSQLにgcloudで接続してみます。
$ gcloud sql connect <INSTANCE_NAME> --user=<USER_NAME>

Whitelisting your IP for incoming connection for 5 minutes...done.
Connecting to database with SQL user [USER_NAME].Password for user <USER_NAME>:
psql (9.5.14, server 9.6.6)
WARNING: psql major version 9.5, server major version 9.6.
         Some psql features might not work.
SSL connection (protocol: TLSv1.2, cipher: ECDHE-RSA-AES128-GCM-SHA256, bits: 128, compression: off)
Type "help" for help.

USER_NAME名=>
うん、立ち上がります。
大丈夫そう。
ローカルからCloudSQLへマイグレーション
おそらく準備はある程度できているので(app.yamlも環境変数も作った)、あとはappengine経由でマイグレーションするだけ。
デプロイも終わってる。
$ bundle exec rails appengine:exec -- bundle exec rails db:migrate
・
・
・
・
・
・
・
・
・
・
・
・

---------- CONNECT CLOUDSQL ----------
ERROR: Failed to start cloud_sql_proxy
2018/11/12 04:58:03 errors parsing config:
    googleapi: Error 403: The client is not authorized to make this request., notAuthorized
ERROR
ERROR: build step 0 "gcr.io/google-appengine/exec-wrapper:latest" failed: exit status 1
-----------------------------------------------------------------------------------------------------------------------------------------------------------------------------------------------

ERROR: (gcloud.builds.submit) build 33763c5f-5791-490b-bade-8e3dda956688 completed with status "FAILURE"
rails aborted!
AppEngine::Util::Gcloud::GcloudFailed: GCloud failed with result code 1
/home/user/project/vendor/bundle/ruby/2.5.0/gems/appengine-0.4.6/lib/appengine/util/gcloud.rb:175:in `execute'
/home/user/project/vendor/bundle/ruby/2.5.0/gems/appengine-0.4.6/lib/appengine/exec.rb:302:in `start'
/home/user/project/vendor/bundle/ruby/2.5.0/gems/appengine-0.4.6/lib/appengine/tasks.rb:255:in `start_and_report_errors'
/home/user/project/vendor/bundle/ruby/2.5.0/gems/appengine-0.4.6/lib/appengine/tasks.rb:155:in `block in setup_exec_task'
/home/user/project/vendor/bundle/ruby/2.5.0/gems/railties-5.2.1/lib/rails/commands/rake/rake_command.rb:23:in `block in perform'
/home/user/project/vendor/bundle/ruby/2.5.0/gems/railties-5.2.1/lib/rails/commands/rake/rake_command.rb:20:in `perform'
/home/user/project/vendor/bundle/ruby/2.5.0/gems/railties-5.2.1/lib/rails/command.rb:48:in `invoke'
/home/user/project/vendor/bundle/ruby/2.5.0/gems/railties-5.2.1/lib/rails/commands.rb:18:in `<main>'
/home/user/project/vendor/bundle/ruby/2.5.0/gems/bootsnap-1.3.2/lib/bootsnap/load_path_cache/core_ext/kernel_require.rb:21:in `require'
/home/user/project/vendor/bundle/ruby/2.5.0/gems/bootsnap-1.3.2/lib/bootsnap/load_path_cache/core_ext/kernel_require.rb:21:in `block in require_with_bootsnap_lfi'
/home/user/project/vendor/bundle/ruby/2.5.0/gems/bootsnap-1.3.2/lib/bootsnap/load_path_cache/loaded_features_index.rb:65:in `register'
/home/user/project/vendor/bundle/ruby/2.5.0/gems/bootsnap-1.3.2/lib/bootsnap/load_path_cache/core_ext/kernel_require.rb:20:in `require_with_bootsnap_lfi'
/home/user/project/vendor/bundle/ruby/2.5.0/gems/bootsnap-1.3.2/lib/bootsnap/load_path_cache/core_ext/kernel_require.rb:29:in `require'
/home/user/project/vendor/bundle/ruby/2.5.0/gems/activesupport-5.2.1/lib/active_support/dependencies.rb:287:in `block in require'
/home/user/project/vendor/bundle/ruby/2.5.0/gems/activesupport-5.2.1/lib/active_support/dependencies.rb:253:in `load_dependency'
/home/user/project/vendor/bundle/ruby/2.5.0/gems/activesupport-5.2.1/lib/active_support/dependencies.rb:287:in `require'
bin/rails:4:in `<main>'
Tasks: TOP => appengine:exec
(See full trace by running task with --trace)
なんで?
問題はこいつかな。
googleapi: Error 403: The client is not authorized to make this request., notAuthorized
IAM周りを見直し
とりあえずサービスアカウントが作成されているか確認しました。
<プロジェクトID>@appspot.gserviceaccount.comがあるかどうかブラウザで確認。存在してましたネ。
ちなみにgcloud projects get-iam-policy <PROJECT_ID>で該当のプロジェクトのIAMが取得できます。
もうひとつ足りなかった
CloudSQL用のIAMで権限が足りないようでした。
以下の記事をちゃんと見なおしたら発覚。
qiita.com
<プロジェクト番号>@cloudbuild.gserviceaccount.comに対してのroleが正しく割り当てられてませんでした。
なので、roleをEditor(編集者)へ変更。
もう一度マイグレーションしてみる
$ bundle exec rails appengine:exec -- bundle exec rails db:migrate
・
・
・
・
・
・
・
・
・
・
・
・

---------- CONNECT CLOUDSQL ----------
cloud_sql_proxy is running.

---------- EXECUTE COMMAND ----------
bundle exec rails db:migrate
rails aborted!
PG::ConnectionBad: could not connect to server: Connection refused
    Is the server running on host "localhost" (127.0.0.1) and accepting
    TCP/IP connections on port 5432?
could not connect to server: Cannot assign requested address
    Is the server running on host "localhost" (::1) and accepting
    TCP/IP connections on port 5432?
/app/vendor/bundle/ruby/2.5.0/gems/pg-1.1.3/lib/pg.rb:56:in `initialize'
/app/vendor/bundle/ruby/2.5.0/gems/pg-1.1.3/lib/pg.rb:56:in `new'
/app/vendor/bundle/ruby/2.5.0/gems/pg-1.1.3/lib/pg.rb:56:in `connect'
/app/vendor/bundle/ruby/2.5.0/gems/activerecord-5.2.1/lib/active_record/connection_adapters/postgresql_adapter.rb:684:in `connect'
/app/vendor/bundle/ruby/2.5.0/gems/activerecord-5.2.1/lib/active_record/connection_adapters/postgresql_adapter.rb:215:in `initialize'
/app/vendor/bundle/ruby/2.5.0/gems/activerecord-5.2.1/lib/active_record/connection_adapters/postgresql_adapter.rb:40:in `new'
/app/vendor/bundle/ruby/2.5.0/gems/activerecord-5.2.1/lib/active_record/connection_adapters/postgresql_adapter.rb:40:in `postgresql_connection'
/app/vendor/bundle/ruby/2.5.0/gems/activerecord-5.2.1/lib/active_record/connection_adapters/abstract/connection_pool.rb:809:in `new_connection'
/app/vendor/bundle/ruby/2.5.0/gems/activerecord-5.2.1/lib/active_record/connection_adapters/abstract/connection_pool.rb:853:in `checkout_new_connection'
/app/vendor/bundle/ruby/2.5.0/gems/activerecord-5.2.1/lib/active_record/connection_adapters/abstract/connection_pool.rb:832:in `try_to_checkout_new_connection'
/app/vendor/bundle/ruby/2.5.0/gems/activerecord-5.2.1/lib/active_record/connection_adapters/abstract/connection_pool.rb:793:in `acquire_connection'
/app/vendor/bundle/ruby/2.5.0/gems/activerecord-5.2.1/lib/active_record/connection_adapters/abstract/connection_pool.rb:521:in `checkout'
/app/vendor/bundle/ruby/2.5.0/gems/activerecord-5.2.1/lib/active_record/connection_adapters/abstract/connection_pool.rb:380:in `connection'
/app/vendor/bundle/ruby/2.5.0/gems/activerecord-5.2.1/lib/active_record/connection_adapters/abstract/connection_pool.rb:1008:in `retrieve_connection'
/app/vendor/bundle/ruby/2.5.0/gems/activerecord-5.2.1/lib/active_record/connection_handling.rb:118:in `retrieve_connection'
/app/vendor/bundle/ruby/2.5.0/gems/activerecord-5.2.1/lib/active_record/connection_handling.rb:90:in `connection'
/app/vendor/bundle/ruby/2.5.0/gems/activerecord-5.2.1/lib/active_record/tasks/database_tasks.rb:172:in `migrate'
/app/vendor/bundle/ruby/2.5.0/gems/activerecord-5.2.1/lib/active_record/railties/databases.rake:60:in `block (2 levels) in <main>'
/app/vendor/bundle/ruby/2.5.0/gems/railties-5.2.1/lib/rails/commands/rake/rake_command.rb:23:in `block in perform'
/app/vendor/bundle/ruby/2.5.0/gems/railties-5.2.1/lib/rails/commands/rake/rake_command.rb:20:in `perform'
/app/vendor/bundle/ruby/2.5.0/gems/railties-5.2.1/lib/rails/command.rb:48:in `invoke'
/app/vendor/bundle/ruby/2.5.0/gems/railties-5.2.1/lib/rails/commands.rb:18:in `<main>'
/app/vendor/bundle/ruby/2.5.0/gems/bootsnap-1.3.2/lib/bootsnap/load_path_cache/core_ext/kernel_require.rb:21:in `require'
/app/vendor/bundle/ruby/2.5.0/gems/bootsnap-1.3.2/lib/bootsnap/load_path_cache/core_ext/kernel_require.rb:21:in `block in require_with_bootsnap_lfi'
/app/vendor/bundle/ruby/2.5.0/gems/bootsnap-1.3.2/lib/bootsnap/load_path_cache/loaded_features_index.rb:65:in `register'
/app/vendor/bundle/ruby/2.5.0/gems/bootsnap-1.3.2/lib/bootsnap/load_path_cache/core_ext/kernel_require.rb:20:in `require_with_bootsnap_lfi'
/app/vendor/bundle/ruby/2.5.0/gems/bootsnap-1.3.2/lib/bootsnap/load_path_cache/core_ext/kernel_require.rb:29:in `require'
/app/vendor/bundle/ruby/2.5.0/gems/activesupport-5.2.1/lib/active_support/dependencies.rb:287:in `block in require'
/app/vendor/bundle/ruby/2.5.0/gems/activesupport-5.2.1/lib/active_support/dependencies.rb:253:in `load_dependency'
/app/vendor/bundle/ruby/2.5.0/gems/activesupport-5.2.1/lib/active_support/dependencies.rb:287:in `require'
bin/rails:4:in `<main>'
Tasks: TOP => db:migrate
(See full trace by running task with --trace)
ERROR
ERROR: build step 0 "gcr.io/google-appengine/exec-wrapper:latest" failed: exit status 1
-----------------------------------------------------------------------------------------------------------------------------------------------------------------------------------------------

ERROR: (gcloud.builds.submit) build c15c595c-6d32-4aa0-9411-397d95b3f12e completed with status "FAILURE"
rails aborted!
AppEngine::Util::Gcloud::GcloudFailed: GCloud failed with result code 1
/home/user/project/vendor/bundle/ruby/2.5.0/gems/appengine-0.4.6/lib/appengine/util/gcloud.rb:175:in `execute'
/home/user/project/vendor/bundle/ruby/2.5.0/gems/appengine-0.4.6/lib/appengine/exec.rb:302:in `start'
/home/user/project/vendor/bundle/ruby/2.5.0/gems/appengine-0.4.6/lib/appengine/tasks.rb:255:in `start_and_report_errors'
/home/user/project/vendor/bundle/ruby/2.5.0/gems/appengine-0.4.6/lib/appengine/tasks.rb:155:in `block in setup_exec_task'
/home/user/project/vendor/bundle/ruby/2.5.0/gems/railties-5.2.1/lib/rails/commands/rake/rake_command.rb:23:in `block in perform'
/home/user/project/vendor/bundle/ruby/2.5.0/gems/railties-5.2.1/lib/rails/commands/rake/rake_command.rb:20:in `perform'
/home/user/project/vendor/bundle/ruby/2.5.0/gems/railties-5.2.1/lib/rails/command.rb:48:in `invoke'
/home/user/project/vendor/bundle/ruby/2.5.0/gems/railties-5.2.1/lib/rails/commands.rb:18:in `<main>'
/home/user/project/vendor/bundle/ruby/2.5.0/gems/bootsnap-1.3.2/lib/bootsnap/load_path_cache/core_ext/kernel_require.rb:21:in `require'
/home/user/project/vendor/bundle/ruby/2.5.0/gems/bootsnap-1.3.2/lib/bootsnap/load_path_cache/core_ext/kernel_require.rb:21:in `block in require_with_bootsnap_lfi'
/home/user/project/vendor/bundle/ruby/2.5.0/gems/bootsnap-1.3.2/lib/bootsnap/load_path_cache/loaded_features_index.rb:65:in `register'
/home/user/project/vendor/bundle/ruby/2.5.0/gems/bootsnap-1.3.2/lib/bootsnap/load_path_cache/core_ext/kernel_require.rb:20:in `require_with_bootsnap_lfi'
/home/user/project/vendor/bundle/ruby/2.5.0/gems/bootsnap-1.3.2/lib/bootsnap/load_path_cache/core_ext/kernel_require.rb:29:in `require'
/home/user/project/vendor/bundle/ruby/2.5.0/gems/activesupport-5.2.1/lib/active_support/dependencies.rb:287:in `block in require'
/home/user/project/vendor/bundle/ruby/2.5.0/gems/activesupport-5.2.1/lib/active_support/dependencies.rb:253:in `load_dependency'
/home/user/project/vendor/bundle/ruby/2.5.0/gems/activesupport-5.2.1/lib/active_support/dependencies.rb:287:in `require'
bin/rails:4:in `<main>'
Tasks: TOP => appengine:exec
(See full trace by running task with --trace)
一旦 googleapi: error 403地獄から抜け出しました。
あとはPG::ConnectionBadの解決のみ。
後日書きます。
追記
すぐに解決しました。
config/database.ymlのproductionにhostを設定してなかったせいでした。
app.yaml構成はこんな感じです。
runtime: ruby
env: flex
entrypoint: bundle exec rackup --port $PORT
skip_files:
  - ^vendor
automatic_scaling:
  min_num_instances: 1
  max_num_instances: 5
  cool_down_period_sec: 120
  cpu_utilization:
    target_utilization: 0.6
beta_settings:
  cloud_sql_instances:  <INSTANCE_CONNECTION_NAME>
threadsafe: true
includes:
  - secret.yaml
secret.yamlに必要な環境変数をセットしてます。
database.ymlのpasswordやhost、socketもここに書いてます。
database.ymlがこんな感じ。
・
・
・
・
・
・
・
・
・
production:
  <<: *default
  host: <%= ENV['POSTGRES_HOST'] %>
  database: <%= ENV['POSTGRES_DATABASE'] %>
  username: <%= ENV['POSTGRES_USER'] %>
  password: <%= ENV['POSTGRES_PASSWORD'] %>
  socket: <%= ENV['CLOUDSQL_STAGING_SOCKET'] %>
環境変数名が違いますが、 socket と host は同じで /cloudsql/<INSTANCE_CONNECTION_NAME> をセットしてます。
hostを設定し、デプロイ後もう一度試したら念願のマイグレーションが通りました。
ホント長かった。
もうこの手順は忘れません。
【Rails】Heroku + Rails + Sendgridでメール送信ができない

どうもてぃです。
今回のことで3日ほど時間を溶かしました。
同じようなことではまってる人が見当たらなかったので、記事にします。
環境
以下僕がやった設定を書きます。
公式ドキュメントの設定
Heroku公式のドキュメント通りにやっていきました。
ドキュメント通りです。まじで。
今回はstaging環境を作成し、Herokuへあげました。
設定はproductionをまるまるコピーしてconfig/environments/staging.rbを作成し、上記ドキュメント通りにやった感じです。
  config.action_mailer.delivery_method = :smtp
  config.action_mailer.perform_deliveries = true
  config.action_mailer.smtp_settings = {
    user_name: ENV['SENDGRID_USERNAME'],
    password: ENV['SENDGRID_PASSWORD'],
    domain: 'yourdomain.com',
    address: 'smtp.sendgrid.net',
    port: 587,
    authentication: :plain,
    enable_starttls_auto: true
  }
↑をぶち込んだだけ。
Heroku環境変数の設定
Herokuの環境変数はheroku configで確認できます。
=== Config Vars
DATABASE_URL:                                      <database url>
HEROKU_POSTGRESQL_NAVY_URL:   <navy postgresql url>
LANG:                                                        en_US.UTF-8
RACK_ENV:                                               staging
RAILS_ENV:                                               staging
RAILS_LOG_TO_STDOUT:                       enabled
RAILS_SERVE_STATIC_FILES:                enabled
SECRET_KEY_BASE:                              <your secret key>
SENDGRID_PASSWORD:                        <your sendgrid password>
SENDGRID_USERNAME:                        <your sendgrid username>
もしくは、 ダッシュボード Settings配下の Config Varsの「Reveal Config Vars」で確認することが出来ます。
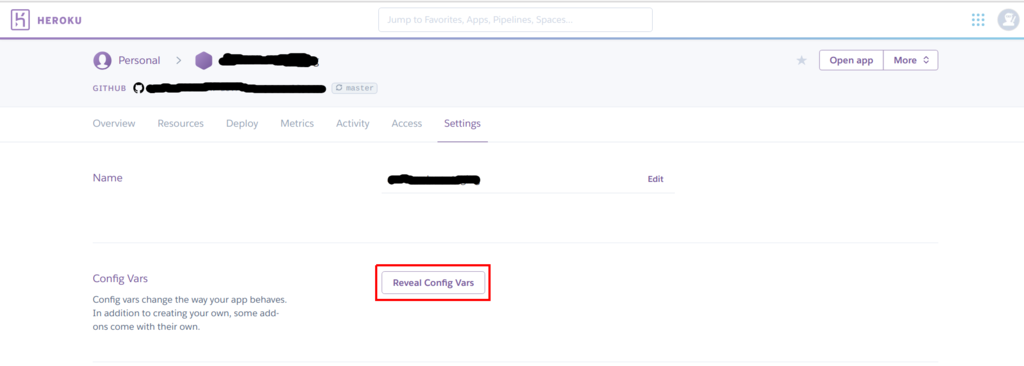
RACK_ENV と RAILS_ENVをstagingへ、SENDGRID_PASSWORD と SENDGRID_USERNAME は heroku addons:add sendgrid:starterをやった際に自動的に設定されます。
ます
ここで足りないのは、 SENDGRID_API_KEY。
Sendgridの画面から生成して設定をします。
$ heroku addons:open sendgrid
でブラウザとともに、Sendgridのダッシュボードが開きます。
開いたら、 Settings -> API Keysを開き、 Create API Keyをクリック。
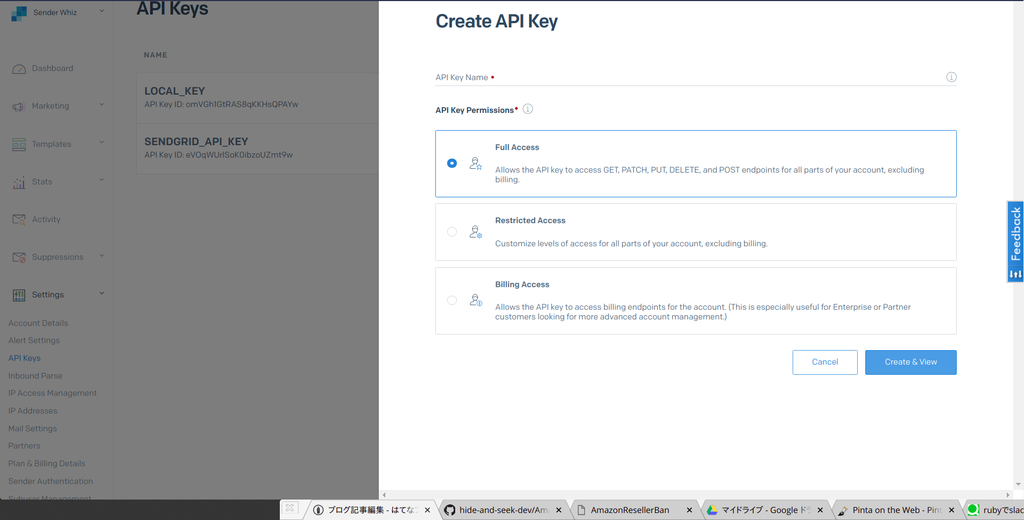
適当なAPI Key Nameを設定し、アクセスはFull Accessへ(プロジェクトに応じて変更してください)。
Create & Viewをクリックすると、以下のような画面でkeyが表示されます。
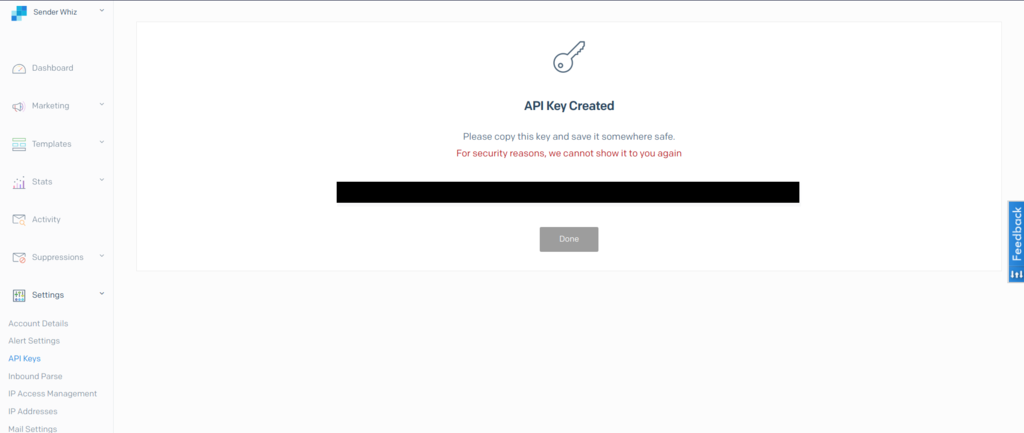
黒く塗りつぶしているところをクリックするとコピーされるので、これをターミナル上からHerokuの環境変数に設定します。
$ heroku config:set SENDGRID_API_KEY='さっきコピーしたKey'
以上、必要な設定は終わり。
これで、適当なところでActionMailerを動かせばいい。
メールが届かない
書いてる通りに設定を行って、いろんな記事を渡り歩いたんですが、メールが送信できない。
というよりも、メール送信はできているけど、Sendgrid経由でメールが送信できていないようでした。
ローカルから実際にSendgrid経由でメールを送ってみたコードが以下(公式に書いてるのと同じ)。
gemの dotenvで.envを設定し、実際に動かしたのですが、Sendgrid経由でメール送信できている。
SendgridのダッシュボードのActivityにも表示されている。API Keyに問題があるわけではなさそう。
次にheroku run rails cで実際にActionMailerでメールを送信してみましたが、コンソール上にはメール送信が完了したとのログしか残らない。
エラーも表示されない。。。 どうしたものか。
設定を見なおした
trelloを見なおしていたら、config/environments/staging.rbがなかった時に別でメール設定を行っていたことが発覚しました。
それが、 config/initializers/mail.rb、こいつ。
if Rails.env.production?
  ActionMailer::Base.delivery_method = :smtp
  ActionMailer::Base.smtp_settings = {
    address: 'smtp.gmail.com',
    domain: 'gmail.com',
    port: 587,
    user_name: ENV['MAIL_ADDRESS'],
    password: ENV['MAIL_PASSWORD'],
    authentication: 'plain',
    enable_starttls_auto: true,
  }
elsif Rails.env.development?
  ActionMailer::Base.delivery_method = :letter_opener
else
  ActionMailer::Base.delivery_method = :test
end
config/environments/staging.rbにメールの設定を書いているのですが、実際にメールが送られるときにはinitializers配下が実行されるようで、何も設定していなかった僕はstaging環境ではすべてtest環境が動くようになっていたのです。
こりゃあ、全部Sendgrid経由でメールが送れないわけですわ。
ということで、config/initializers/mail.rbへHeroku用にstagingの設定を書き込みました。
if Rails.env.production?
  ActionMailer::Base.delivery_method = :smtp
  ActionMailer::Base.smtp_settings = {
    address: 'smtp.gmail.com',
    domain: 'gmail.com',
    port: 587,
    user_name: ENV['MAIL_ADDRESS'],
    password: ENV['MAIL_PASSWORD'],
    authentication: 'plain',
    enable_starttls_auto: true,
  }
elsif Rails.env.development?
  ActionMailer::Base.delivery_method = :letter_opener
elsif Rails.env.staging?
  ActionMailer::Base.delivery_method = :smtp
  ActionMailer::Base.default_url_options = { host: 'yourhost.com' }
  ActionMailer::Base.perform_deliveries = true
  ActionMailer::Base.smtp_settings = {
    user_name: ENV['SENDGRID_USERNAME'],
    password: ENV['SENDGRID_PASSWORD'],
    domain: 'herokuapp.com',
    address: 'smtp.sendgrid.net',
    port: 587,
    authentication: :plain,
    enable_starttls_auto: true
  }
else
  ActionMailer::Base.delivery_method = :test
end
解決
ちょうどGitHubが落ちてしまって、この設定のプルリクがマージできなかったのですが、今朝障害が直ったようでして、僕の方の障害も一緒に直りました。
さすがGitHub様様です。
elementaryOS(Ubuntu 16.04.5 LTS)でUSキーボードを使うと幸せになれる
どうもてぃです。
プログラマーたるもの、やはりUSキーボードでしょう。
経緯としては、やっぱりmacのようなトラックパッドを実現するのは、他社のPCでは厳しいというのと、せっかくならUSにしてみようと言う好奇心から買ってみました。
以下、現PCへの苦情まとめ。
- タイピングをしていると、トラックパッドに手のひらが当たって入力できない
ctrl + tを押して新規タブを作成すると高確率でフォームにカーソルが行かない- 移動が思ったように行かない
- キー配列がゴミ(一番右になんかおる)
- やっぱり押し心地が悪い
etc...

とまあ、上げればキリが無いですが、毎日使うものなのでストレスはそれなりにたまります。
お金に余裕が出てきたので、とりあえずUSキーボード入門として安いやつ買ってみました。
ThinkPadのキーボード
いいですよね。
サブ機でちょっと前にThinkPad X280を使ってたのですが、赤◯首とキーの押し心地が凄い良い。
という思い出があったので、ThinkPadのキーボードを買いました。
これ。
飽食なのでアフィリリンク貼っときます。
bluetoothにしなかったのは、レビューにも合ったのですが、遅延のせいで制御があまりうまく行かなかったりするそうなので今回は見送りました。
援助していただいているスーパーエンジニアの方がHHKBを有線で使っていたのもあってそれに倣いました。
コードが邪魔なので、これも買いました。
ちょっと長くて、向きをミスりましたがいまのところ満足。不便なら買い換えます。
設定
ibuz-mozcとfcitxで設定しました。
始めは以下の記事を参考に設定。
ただ、なぜか上の記事の「Mozcのキー設定変更」以下をやってみても、ctrl + spaceだと文字切り替えがうまく行かず。。。
独自のやり方で設定しました。
上の記事の「キーボードレイアウト変更」までやった状態です。
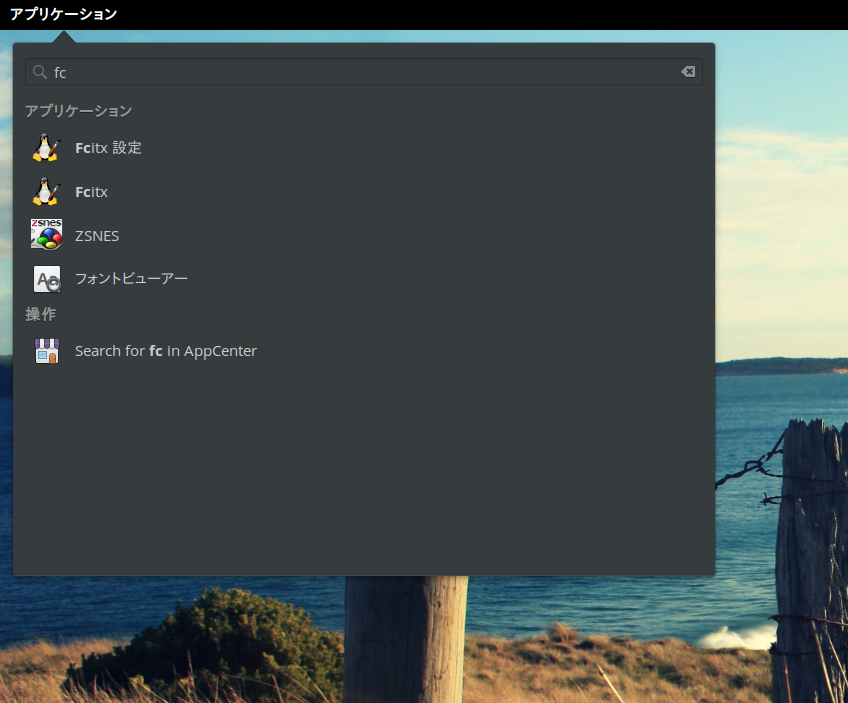
まず、左上のアプリケーションから「アプリの検索」で「Fcitx 設定」を開く。
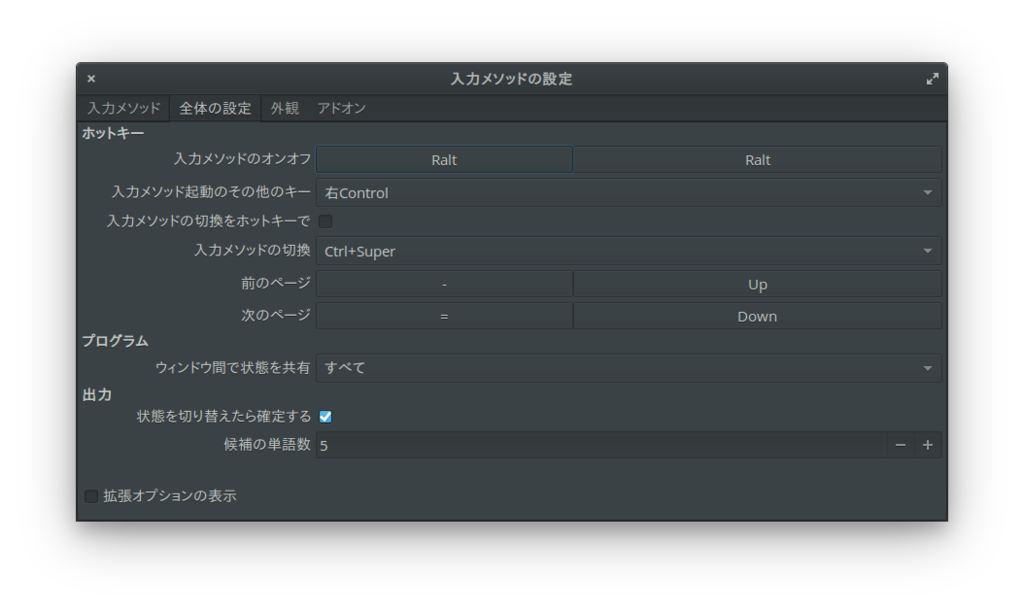
次にタブで「全体の設定」へ行き、入力メソッドのオンオフを設定する。
僕の場合、スペース右のAltで変更できるようにしました。
macっぽく。
これだけで一旦設定は終了です。
ただ、これだと、US -> Mozc -> USと行くと、右上の表記はUSなのに、実際に打つ文字はJISになっているという現象が起きます。
なので、Mozcを解除した際に、USへ切り替えるように設定します(これ以外にも、キーボードレイアウトの状態を修正しても直らなかった)。
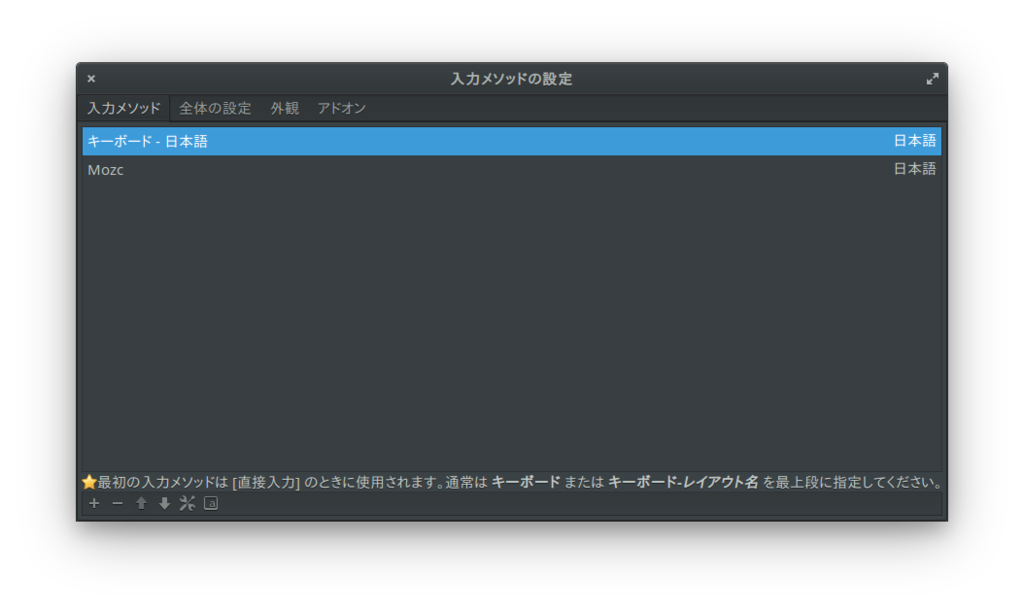
上タブの「入力メソッド」へ行き、左下の+を押下。
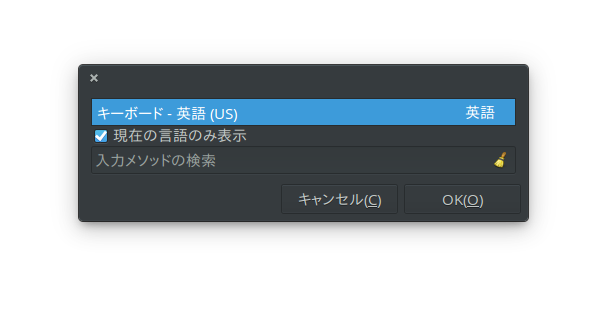
セレクトボックスの一番下にUSがあるので選択してOK。
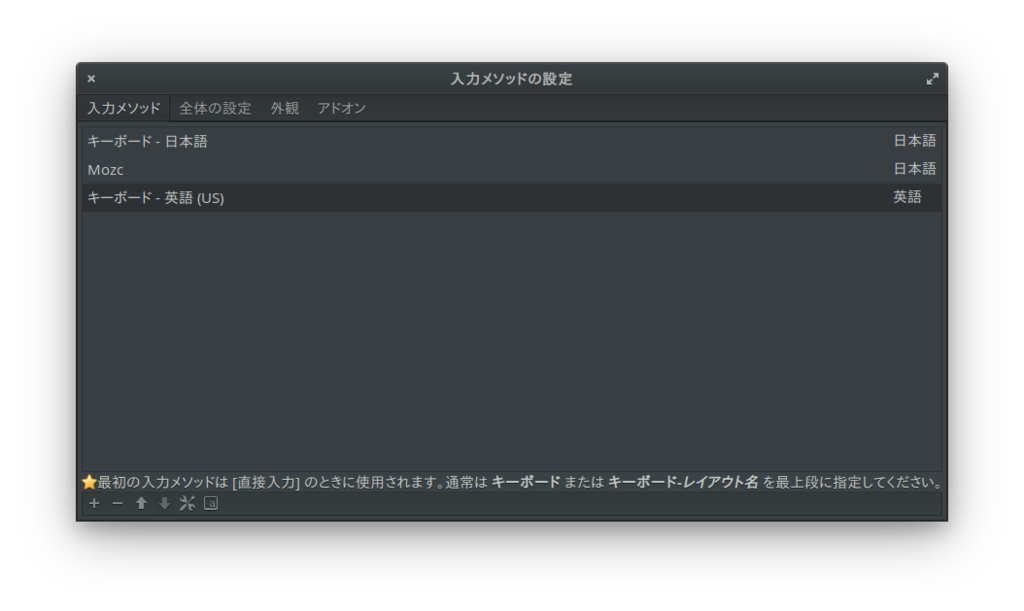
この状態になったら、必要なくなったキーボード - 日本語を選択して、-で削除する。
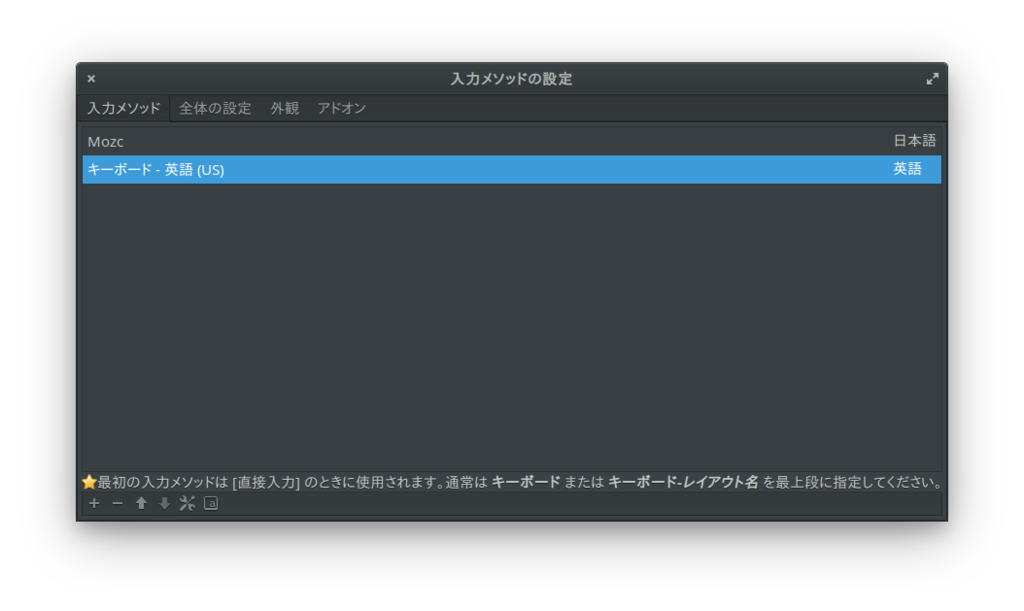
最後にキーボード - 英語(US)を選択して、↑で優先順位を上げる。
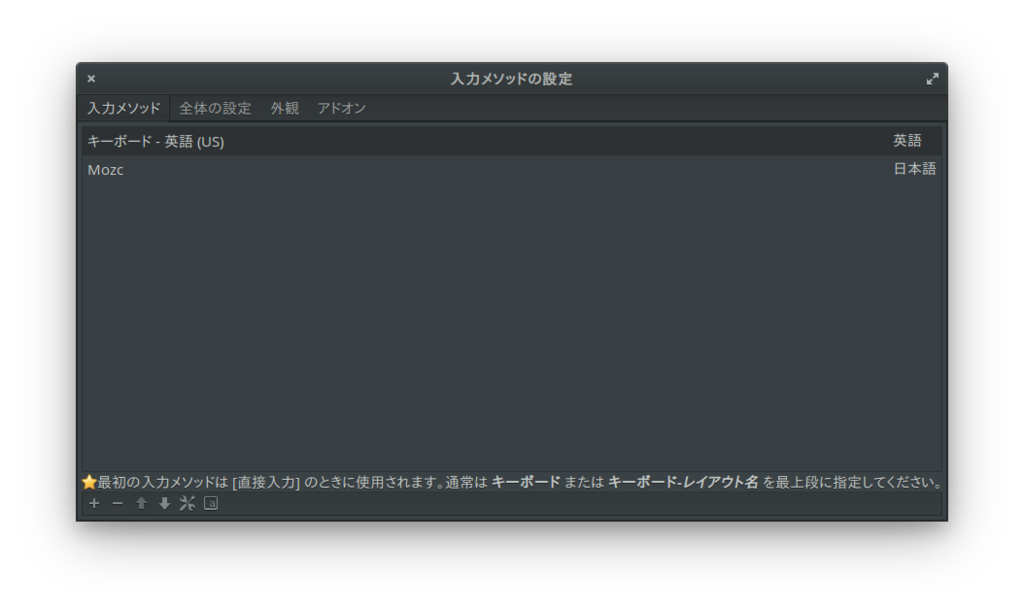
これで完了。
超快適

あとは外付けキーボードを接続した際に、内蔵キーボードを無効化する設定をしたら終了なのですが、時間がかかりそうなのでまた今度やる。
めっちゃ快適ですー^^
壊れたらHHKB買います。


